
It’s Thursday and it is time for another Happy Inkin’ Thursday Blog Hop! Are you ready to hop around and see some great projects?
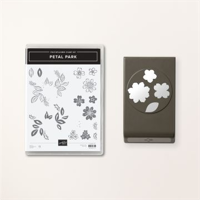
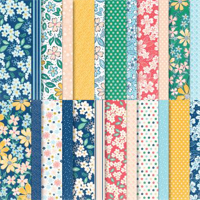
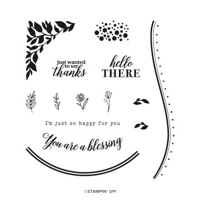
I created my card for today using the Petal Park Bundle (stamps and punch), the Regency Park 6″ x 6″ Designer Series Paper, the Around the Bend Stamp Set, and the Something Fancy Dies.

We have a sketch challenge for today’s Hop…and here it is.

I started off with a card base in Night of Navy measuring 11″ x 4-1/4″. The card base was scored at 2-3/4″ and 8-1/4″ on the long side.
Two patterned papers from the Regency Park 6″ x 6″ Designer Series Paper pack were chosen – one in a Petal Pink and Night of Navy stripe and the other a Night of Navy dotted pattern. The striped paper was cut to the finished card size of 5-1/2″ x 4-1/4″ and the dotted paper was cut to 5-1/2″ x 2-3/4″. The dotted paper was adhered to the striped paper and centered top to bottom. On the long side, the paper was cut in half at 2-3/4″, creating two separate panels. These panels were adhered to the right and left of the card front.
The inside panel was stamped with a sentiment from the Around the Bend Stamp Set in Night of Navy ink. I also used the large, detailed stamps for the leaves and flowers from the Petal Park Stamp Set. These images were stamped in Night of Navy ink in the lower left of the inside panel. I used Stampin’ Blends in Petal Pink, Balmy Blue and Sweet Sorbet to color in the flowers. The largest flower was colored in with Mango Melody ink using a Blender Pen. The panel was then adhered to the inside of the card.

A sentiment label was die cut using the smallest rectangle die from the Something Fancy Dies set in Petal Pink cardstock. A sentiment from the Around the Bend Stamp Set was stamped onto the label. A mat was cut using the medium-sized rectangular die from the Something Fancy Dies set in Balmy Blue and the sentiment label was adhered to this mat.
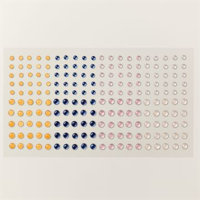
The Petal Park Builder Punch will punch out flowers and a leaf from the Regency Park Designer Series Paper. I punched out several flowers from this paper using the punch.

I used an 11″ x 1-1/4″ strip of Night of Navy cardstock for the belly band. To assist in folding the ends of the belly band around the card front, I scored the band on the long side once at 2-3/4″. The card was placed on top of the belly band, and I wrapped the ends of the band around each side of the card. Because the total width of the card is 11″ and the belly band is 11″ wide, this leaves a small gap. I used a small piece of Night of Navy cardstock to “bridge” the ends of the belly band together using liquid glue and made sure I could easily move the band across the card before allowing the glue to fully set. This small piece of cardstock, or bridge, will be hidden by the sentiment label.
Now on to decorating the belly band! I adhered the matted sentiment label to the belly band using Stampin’ Dimensionals and positioned the label slightly right of center of the card. I then dry fit the punched flowers to the left of the sentiment label. Once I was happy with placement I glued the two small and one medium sized flower into place on the belly band. The largest Mango Melody flower was adhered to the belly band using Stampin’ Dimensionals.
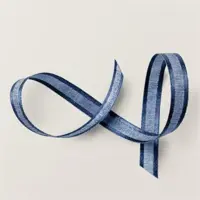
I placed Night of Navy Adhesive-backed Milky Dots on the centers of the two small and one medium sized flower, and one dot was placed on the sentiment label. A Mango Melody Dot was placed in the center of the large flower. I used a short length of Night of Navy Bordered Ribbon and tied a knot. The ends of the ribbon were trimmed down and the knot was adhered to the top right of the sentiment label using a Mini Glue Dot.
I used the same large, detailed leaf and flower stamps and stamped these images partially onto the envelope front in Night of Navy ink and then colored in the leaves and flowers. A piece of coordinating designer series paper was adhered to the envelope flap, and I trimmed the excess paper away to finish off the envelope.

I hope you enjoyed reading how I created my card for today’s Hop! I love how this gatefold card turned out using the Petal Park images and the Regency Park Designer Series Paper and, well, belly bands are just plain fun!
If you’d like to recreate this card you can click on the image below to download the pdf tutorial.

To view a video of how this card was created, visit https://youtu.be/fw4y-6cs1cQ.
If you hopped over from Tara’s blog, thank you for stopping by! You can click on the Next button below to go to Amy Koenders blog and the top of the blog hop list, or you can click on any name below to visit that person’s blog. Enjoy the Hop!

- Amy Koenders
- Mary Deatherage
- Jaimie Babarczy
- Karen Finkle
- Akiko Sudano
- Karen Ksenzakovic
- Tara Carpenter
- Carol Buckalew (You are here!)
Ready to Join Our Team?
If you’re looking to join the Stampin’ Up! team as a demonstrator, come join my team! As a demonstrator you can earn 20%+ off products and there is no pressure to maintain demonstrator status if you decide it’s not for you. We have many hobby demonstrators who strictly maintain their demonstrator status just for the discount, and other demonstrators who wish to grow a business. Either way, we have loads of FUN! Look at all of the smiling faces!
Sale-a-bration is also a great time to join my team and the Stampin’ Up! community! As a new team member, you get to choose products for your Starter Kit but during Sale-a-bration the offer is even sweeter! Here are the incredible joining options during Sale-a-bration:
- Option 1: The exclusive Boho Blue Mini Stampin’ Cut & Emboss Machine ($63 value) + your choice of $175* of Stampin’ Up! products for only $129.
- Option 2: The original white Mini Stampin’ Cut & Emboss Machine ($63 value) + your choice of $175* of Stampin’ Up! products for only $129.
- Option 3: Your choice of $175* of Stampin’ Up! products for only $99.
*That’s $50 more product than the standard Starter Kit offer!
If you have been on the fence about joining the Stampin’ Up! team but you’re now ready to take the leap…join between January 5 and February 28 for this fantastic offer! Now is the time! If you have questions about what it means to be a Stampin’ Up! Demonstrator, feel free to reach out to me…I would love to chat with you! I can tell you that my time with Stampin’ Up! has been wonderful and the Stampin’ Up! community is the absolute best…supportive and fun! You can contact me at inkybeestampers@gmail.com.
If you’ve already made up your mind and you’re ready to join, click on the image below.

February Host Code!

Did you know that you can purchase supplies from me to make your own beautiful creations? And if you use my current Host Code, you will receive a free gift from me valued at $8 when you place an order of $25 or more (before shipping and tax). Use the February Host Code – 2ZUH66G3. You can also click here to visit my Customer Rewards Page for the current Host Code.
I offer other Customer Rewards programs, too! To learn more about Inky Bee Stamper’s customer rewards programs, visit my Customer Rewards page here.


15 responses to “Stampin’ Up! Petal Park Gatefold Thank You Card with Belly Band for the Happy Inkin’ Thursday Blog Hop”
Gorgeous card! I love the belly band! TFS
LikeLike
Thanks very much, Tara! 🙂
LikeLike
Beautiful Carol 🙂 Love the mix of DSP’s
LikeLike
Thank you, Karen! 🙂
LikeLike
So pretty Carol! Love the fun fold and belly band, perfect with the pretty mix of designer papers that you’ve used! 🙂
LikeLike
Thank you, Amy! 🙂
LikeLike
Love the colors, the fun fold, the belly band. I guess it would be easier to say I like the entire card!😊💖
LikeLike
LOL…thanks very much, Shirley! 🙂
LikeLike
Gorgeous Carol!! I love how you used a fun fold for the sketch! 😊
LikeLike
Thanks very much, Akiko! I love a card with a belly band!
LikeLiked by 1 person
Great card – love the fun fold! And – really enjoyed watching you make it the other day! 🙂
LikeLike
Thank you, Mary! I’m glad you enjoyed the video! 🙂
LikeLike
Hi Carol….I was almost holding my breath wondering how you were going to pull that off……a belly band on a horizontal card…but you did it perfectly! I love the colors too.
LikeLike
Thank you, Faith! 🙂
LikeLike
[…] Carol Buckalew […]
LikeLike