
It is Thursday and time for another Happy Inkin’ Thursday Blog Hop! Welcome to my blog…I’m happy you are here! I know that there are going to be some awesome and inspirational projects included in the Hop today so be sure to use the navigation buttons below this post to Hop around!
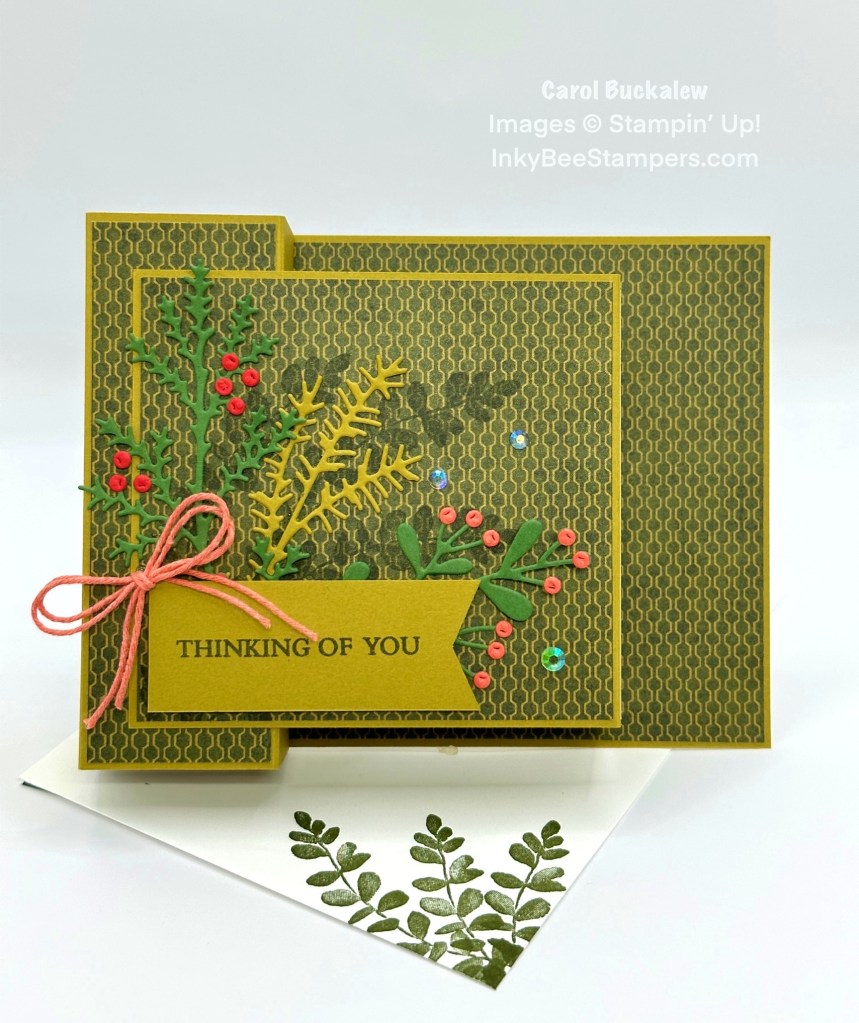
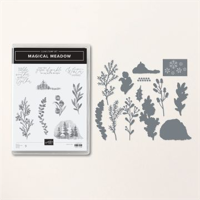
I haven’t created a Double Box Fun Fold in a while so I thought I would share one with you today. I created this card using the Magical Meadow Bundle and the One Horse Open Sleigh 6″ x 6″ Designer Series Paper.
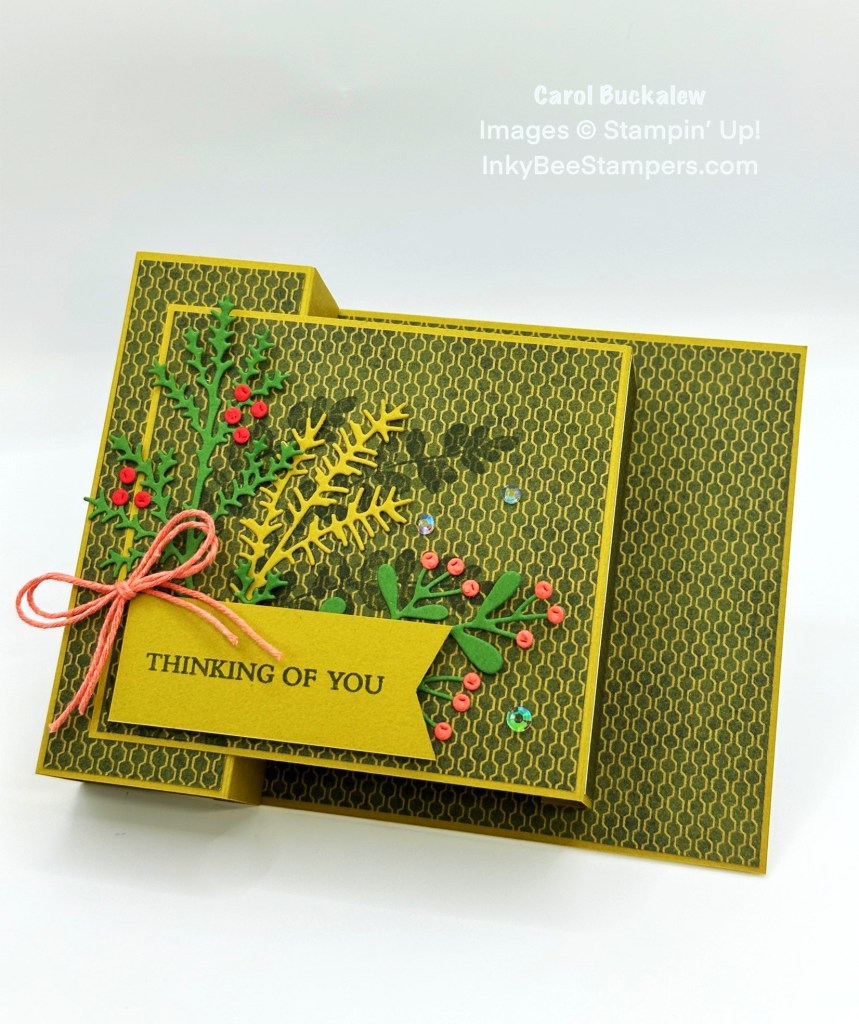
We have a color challenge for the Hop today. The colors in the challenge belong to the Garden Walk Suite…but I don’t own this suite of products…yet! So, I improvised and used the Magical Meadow Bundle and One Horse Open Sleigh Designer Series Paper and managed to use 5 of the 6 colors in the challenge! Whew!
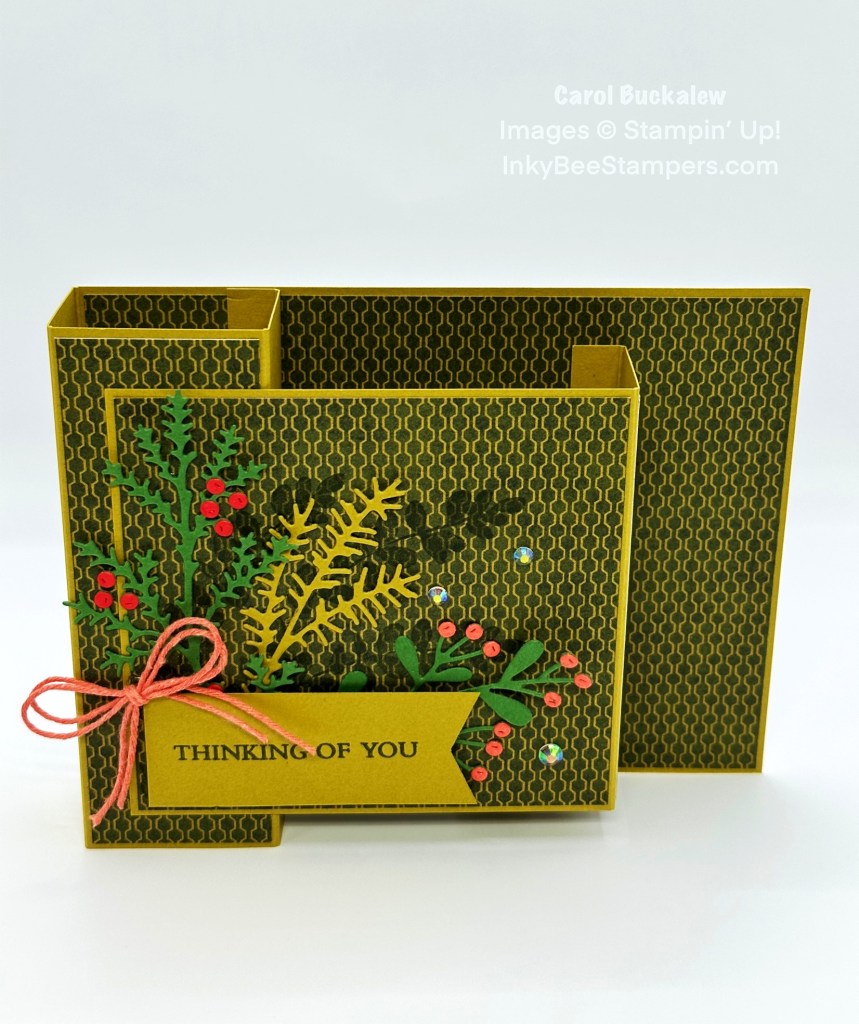
The Double Box Fancy Fold card is made up of two box bases. The first box base, what I call Box Base #1, measures 9-3/8″ x 4-1/4″ and is scored on the long side at 3/8″, 1-3/8″, 2-7/8″ and 3-7/8″. Box Base #2 measures 5-1/8″ x 3-1/2″ and is scored on the long side at 3/8″ and 1-3/8″. Panels for each box were cut from a Mossy Meadow print from the One Horse Open Sleigh 6″ x 6″ Designer Series Paper. The designer series paper panel measuring 5-3/8″ x 4-1/8″ was first adhered to the large section of Box Base #1 before the bases were adhered to each other. I then assembled the box for Box Base #1 as illustrated below.

The smaller of the designer series paper panels for Box Base #1 was then adhered to the top of the box.
For the larger designer series paper panel for Box Base #2 I stamped the long slender greenery image from the Magical Meadow Stamp Set several times across the panel in Mossy Meadow ink. The designer series paper panels were then adhered to Box Base #2 and the base was adhered to Box Base #1 as follows:

Using the Magical Meadow Dies, I die cut one evergreen sprig with berries from Garden Green cardstock, one evergreen sprig without berries from Wild Wheat cardstock, one leaf sprig with berries from Garden Green cardstock and two sets of berries – one from Poppy Parade cardstock and one from Calypso Coral cardstock. The berries were adhered to the evergreen and leaf sprigs using liquid glue.

A sentiment label measuring 3″ x 1″ was cut from Wild Wheat cardstock. Before stamping the sentiment, I used the Banner Pick A Punch to punch a banner end on the right side of the label. The “Thinking of you” sentiment from the Lasting Joy Stamp Set was stamped onto the label in Mossy Meadow ink. I arranged the die cut greenery onto the top panel of the card and adhered the pieces down using liquid glue. The sentiment was adhered onto the lower left of the top panel using Stampin’ Dimensionals.
A length of white Baker’s Twine was colored with a Claypso Coral Stampin’ Blend, and I tied two strands of the twine into a double bow. The bow was adhered to the top left of the sentiment label using a Mini Glue Dot. Several Iridescent Rhinestones were adhered to the card front.
On the lower corner of the back panel, I stamped the long, slender leaf image from the Magical Meadow Stamp Set in Mossy Meadow ink several times, varying the height of the stamped images. The panel was then adhered to the back of the card.
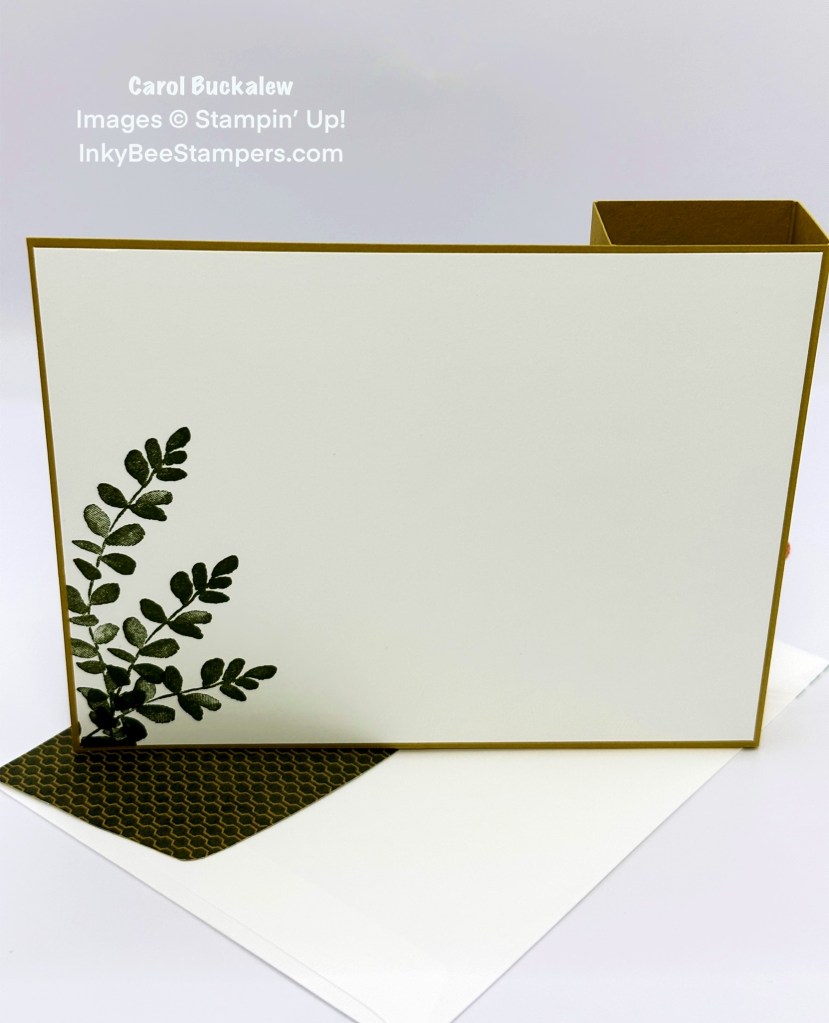
The same leaf image was stamped in Mossy Meadow ink onto the envelope front and a piece of coordinating designer series paper was adhered to the envelope flap and I used my paper snips to trim the excess paper away from the flap.
While this card might look intimidating to put together, it is actually not that difficult. I provide full, detailed instructions on the linked pdf below which include cutting measurements.
Thanks so much for stopping by my blog! I hope you enjoyed my card for today’s Hop! You can download, save and print the pdf tutorial for this card by clicking on the image below if you’d like to recreate it.
Let’s get back to the Hop! If you’re joining the Hop from my blog, be sure to use the navigation links below to see more creativity and inspiration! You can click on the Next button to go to Amy Koenders’ blog and the top of the blog hop list or click on any name in the list below to visit that person’s blog. Enjoy!

- Amy Koenders
- Mary Deatherage
- Jaimie Babarczy
- Akiko Sudano
- Karen Ksenzakovic
- Tara Carpenter
- Terry Lynn Bright
- Carol Buckalew (You are here!)
Ready to Join the Stampin’ Up! Family?
If you’re looking to join the Stampin’ Up! team as a demonstrator, come join my team! As a demonstrator you can earn 20%+ off products and there is no pressure to maintain demonstrator status if you decide it’s not for you. We have many hobby demonstrators who strictly maintain their demonstrator status just for the discount, and other demonstrators who wish to grow a business. Either way, we have loads of FUN! Becoming a Demonstrator offers some other great benefits, too:
- 20%+ Discount on your demonstrator orders
- Be a part of a fun and supportive team and the Stampin’ Up! community
- Early access to new catalogs and promotion information
- Early ordering for new products
- Be a hobby demonstrator or start a business
- No pressure to sell products
- My full support when you join my team
If you have questions about what it means to be a Stampin’ Up! Demonstrator, feel free to reach out to me…I would love to chat with you! I can tell you that my time with Stampin’ Up! has been wonderful and the Stampin’ Up! community is the absolute best…supportive and fun! You can contact me at inkybeestampers@gmail.com. If you’ve already made up your mind and you’re ready to join, click here.
October Paper Pumpkin Kit – Home for the Holidays

Create dazzling traditional Christmas cards with the Home for the Holidays Paper Pumpkin Kit! This kit includes eight beautiful cards—four each of two designs. Whether you want to send a few to your loved ones or fill your home with some extra special Christmas cheer, this kit has everything you need to make some sparkly, festive cards. Keep reading to learn more!
One extra fun feature of the Home for the Holidays Paper Pumpkin Kit is the bottle of glitter glue that you will receive in your kit! You can use this glue to add shimmery, shiny details to the Christmas scenes on your cards. Add glitter to the trees, houses, snow and more!
But that’s not all! While the October kit provides cards and coordinating envelopes, the November Paper Pumpkin Kit coordinates with the October Paper Pumpkin Kit! So, you will be able to extend your holiday crafting experience even more! I’m not sure what the November kit will include, but I’m guessing that it will include coordinating tags…or maybe treat boxes. I can’t wait!
Here are the kit details for the October Paper Pumpkin Kit:
- All the supplies you’ll need to create 8 sparkly and dazzling Christmas cards—4 each of 2 designs—and eight coordinating envelopes.
- A coordinating photopolymer stamp set with endearing holiday sentiments and festive designs.
- A Real Red Stampin’ Spot
- A bottle of Glitter Glue
- Beautiful Christmasy-themed precut pieces
- Finished folded card size: 4-1/4″ x 5-1/2″ (10.8 x 14 cm)
- Coordinating Stampin’ Up! colors: Balmy Blue, Blueberry Bushel, Cherry Cobbler, Crumb Cake, Crushed Curry, Daffodil Delight, Lemon Lolly, Mossy Meadow, Night of Navy, Old Olive, Pecan Pie, Real Red
You will need to subscribe to Paper Pumpkin by no later than October 10 in order to receive the Home for the Holidays Kit! If you would like to view the flyer for the Home for the Holidays Paper Pumpkin kit, click here.
Paper Pumpkin kits are such a great option. All materials are included in each kit along with instructions on how to assemble the projects. The kits are a great option if you are a new paper crafter or if you just want to dive in and start creating! Plus, you can pause and restart your subscription at any time. Have I convinced you yet? I hope so! Have questions? Drop me an email!
Ready to subscribe? Click on the photo below to sign up!
Save Up to 60% Off on Clearance Rack Items!
The Clearance Rack has been refreshed and you can save up to 60% on products! Be sure to check it out…but don’t delay! Items are while supplies last!
Click here to shop the Clearance Rack now!
September Host Code

Use my current Host Code and receive a free gift from me valued at $8 when you place an order of $25 or more (before shipping and tax). If you place an order greater than $150, do not use the Host Code as you will be eligible for Stampin’ Rewards (but you will still receive the free gift from me!). Use my September Host Code – HBQ7CWNR.
I offer other Customer Rewards programs, too! To learn more about Inky Bee Stamper’s customer rewards programs, visit my Customer Rewards page here.


13 responses to “Stampin’ Up! Magical Meadow Double Box Fancy Fold Card for the Happy Inkin’ Thursday Blog Hop”
So pretty Carol 🙂 Loved watching you make it
LikeLike
Thank you, Karen! Thanks for joining my Live yesterday, too!
LikeLike
Great tutorial! The card is lovely! TFs
LikeLike
Thanks very much, Tara!
LikeLike
Such a pretty card! Love the little die cuts, great fun fold design! 🙂
LikeLike
Thank you, Amy!
LikeLike
Such a beautiful card! I love your simple and elegant layering – perfect for this fun fold! 😊
LikeLiked by 1 person
Thank you, Akiko!
LikeLiked by 1 person
SOOO pretty! I love your collage – and the colors – and the fun fold! Well – I just kinda love it all! And I really enjoyed watching you make it yesterday! 🙂
LikeLiked by 1 person
Thanks so much, Mary! And thank you for joining me on my Live FB! 🙂
LikeLike
[…] Carol Buckalew […]
LikeLike
Really pretty card. Love that double box fold and great directions!
LikeLiked by 1 person
Thanks very much, Terry Lynn! The double box fold is one of my favorites!
LikeLike