
Do you like the look of stamped images on craft paper? If so, today’s card is for you! I used the Lasting Joy Stamp Set, a mask from the Artistic Mix Decorative Masks set, and a few ink colors to create this card. I love the charming look of this card so much!
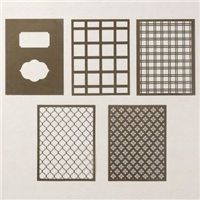
I started off by using the trellis-like mask from the Artistic Mix Decorative Masks set on the Crumb Cake card front. I first centered the mask onto the front of the card, then secured the mask down to my work surface using small pieces of Post It Tape. I then used a blending brush to blend Crumb Cake ink onto the surface. Using masks is such a fun way to create a beautiful background on your cards!
Using the flower images from the Lasting Joy Stamp Set, I first stamped the largest flower multiple times onto a Crumb Cake panel measuring 4-1/2″ x 3-1/4″. This flower was stamped in Flirty Flamingo ink. I was careful to evenly space out these large, stamped flowers. The centers of the flowers were stamped in Night of Navy ink. The leaf stem image was stamped next to each flower in Granny Apple Green ink. I used the smallest flower from the stamp set and stamped this image around the card front to fill in the open areas. These small flowers were stamped in Bubble Bath ink. The small (and I mean really, really tiny!) leaves were stamped in Granny Apple Green ink on the sides of the small Bubble Bath flowers.
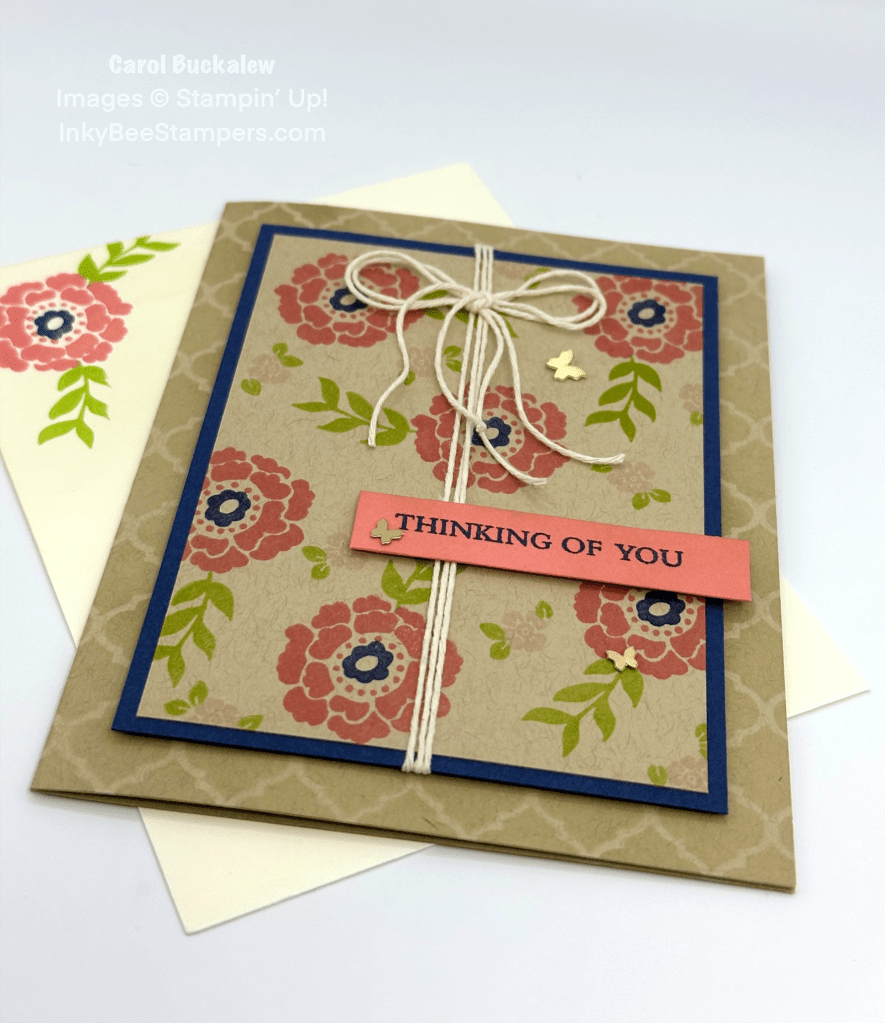
The stamped panel was then adhered to a mat in Night of Navy. I used a cream color Baker’s Twine and wrapped the twine around the stamped and matted panel three times. The ends of the twine were secured to the back of the panel using small amounts of Stampin’ Seal. I then adhered the panel to the card front using Stampin’ Dimensionals. I added a double Baker’s Twine bow towards the top of the card. The sentiment was stamped onto a Flirty Flamingo sentiment label, and I adhered the sentiment label approximately two thirds of the way down the card front and to the right. The sentiment label slightly overhangs the wrapped twine on the left.
For the inside panel, I chose to use a piece of Crumb Cake cardstock…not traditional, but it totally works for this card! The large flower image was stamped onto the lower corner of the panel in Flirty Flamingo ink and the flower center was stamped in Night of Navy ink. The leaf stems were stamped on either side of the flower in Granny Apple Green ink. The panel was adhered to another mat in Night of Navy and then adhered to the inside of the card.

To finish up the card, I stamped the same flower and leaf image onto the envelope front. The small flowers and leaves were stamped across the edge of the envelope flap. Several Brushed Brass Butterflies were added to the card front and I even added a butterfly next to the flower on the inside of the card! The Brushed Brass Butterflies are flat, so they work great on the inside of cards, too!

This was such a fun card to make! If you would like to recreate this card you can download, save and print the pdf tutorial by clicking on the image below.

It is Time to Redeem Your Bonus Days Coupons!
You may have collected one or more Bonus Days coupons during the month of July. It is now time to redeem those coupons during the month of August! Redeem your coupons in the Online Store from now through August 31, 2023.
If you placed an order through the Online Store during the month of July, then you received a $5 coupon for every $50 you spent. You will have received the coupon codes via email. If you don’t see your coupon code emails, then check your spam folder. Here are the details:
Redemption Period: 1–31 August 2023
Ordering Deadlines – Phone: 31 August 2023 at 6:59 p.m. (MT); Online: 31 August 2023 at 11:59 p.m. (MT)
- There is no limit to the number of coupon codes participants can redeem on an order during the redemption period. If using multiple codes, they must be separated by a space.
- Coupons may be redeemed one time only.
- Coupon codes may be redeemed for any product (excluding Starter Kits, demonstrator supply items, and Paper Pumpkin month-to-month subscriptions).
- New prepaid Paper Pumpkin codes may be discounted using Bonus Days coupon codes.
Be sure to redeem those Coupon Codes! Ready to shop now? Click on the image below to go to the Online Store.

Kits Sale During the Month of August! Save Up to 30% Off!

You can save up to 30% on amazing kits from the Kits Collection by Stampin’ Up! during the month of August! The Kits Collection contains a wide variety of options too! Here are the details:
- Sales Period: 1–31 August
- Ordering Deadlines – By Phone: 31 August 2023 at 6:59 p.m. (MT) or Online: 31 August 2023 at 11:59 p.m. (MT)
- The sale only applies to the Kits Collection by Stampin’ Up! (it does not include Paper Pumpkin kits).
- All order types qualify for this promotion.
- There is no limit to how many kits may be purchased.
- The kits will be up to 30% off as indicated on the website.
- No discount code necessary—the discount will be applied automatically.
If you are a new crafter or a really busy crafter, kits are an excellent option. Everything you need to complete the kit is included!
View the flyer for the Kits Sale promotion by clicking here.
August Paper Pumpkin Kit – Meaningful Flowers

Discover messages of friendship and loyalty in the flowers from the August Paper Pumpkin Kit! This kit includes 8 cards, 4 each of 2 designs, and 8 coordinating envelopes. The kit is special because of the way it uses the meaning of flowers. On each card, you’ll find a small inscription of what the flowers represent. As you craft with the included vellum and watercolor paper pieces, you’ll know you’re sending a message of encouragement and loyalty to your recipients.

To receive the Meaningful Flowers Paper Pumpkin Kit you must subscribe no later than August 10, 2023…that is just a few days away!
Here is what the kit includes:
- 8 cards; 4 each of 2 designs
- 8 coordinating envelopes
- 1 photopolymer stamp set
- 1 Pretty Peacock Ink Spot
- Linen thread
- Vellum and precut paper pieces
- FREE Distinktive stamp set
- Adhesives
- Final card size: 4-1/4″ x 5-1/2″ (10.8 x 14 cm)
- Coordinating Stampin’ Up! colors: Bubble Bath, Crushed Curry, Garden Green, Melon Mambo, Misty Moonlight, Orchid Oasis, Pretty Peacock, Tahitian Tide
To view the Meaningful Flowers Paper Pumpkin Kit flyer, click here.
Paper Pumpkin kits are such a great option. All materials are included in each kit along with instructions on how to assemble the projects. The kits are a great option if you are a new paper crafter or if you just want to dive in and start creating! Plus, you can pause and restart your subscription at any time. Paper Pumpkin kits are also fantastic if you’re travelling as everything is included in one box…just grab and go!
Ready to subscribe? Click on the photo below to start your subscription to Paper Pumpkin!
August Host Code

Did you know that you can purchase supplies from me to make your own beautiful creations? And if you use my current Host Code, you will receive a free gift from me valued at $8 when you place an order of $25 or more (before shipping and tax). Use my August Host Code – D9JFXU4E. However, don’t use the Host Code if your order is $150 or more because you will receive Stampin’ Rewards instead (you will still receive the gift from me though!).
I offer other Customer Rewards programs, too! To learn more about Inky Bee Stamper’s customer rewards programs, visit my Customer Rewards page here.


11 responses to “Stampin’ Up! Lasting Joy Thinking of You Card”
Hello ~
The link is not working?
Thanks Melanie
>
LikeLike
Thanks for letting me know, Melanie! The link for the pdf tutorial should be good now. Have a great day!
LikeLike
So pretty Carol! The colors are perfect, love the layers too! 🙂
LikeLike
Thanks very much, Amy! 🙂 I had lots of fun creating this card!
LikeLike
This is beautiful, Carol….like a gorgeous DSP! Stamping looks wonderful on kraft!!
LikeLike
Thank you, Faith! I like the look of stamping on a darker cardstock, too! Have a great day!
LikeLike
This is truly a WOW card! I’ve just recently gotten interested in stamping on kraft (or crumb cake) cardstock and your gorgeous card has greatly inspired me! Can’t wait to try my hand at it! Thanks for sharing your talent with all of us!
LikeLike
Thank you, Rita! I’m happy you like the card! I don’t do this technique often, but I really liked the results on this particular card. Thanks so much for stopping by my blog and leaving me a comment! 🙂
LikeLike
I also love the stenciling on your card front … you’ve certainly inspired me!
LikeLike
Stenciling a background on a card can make a big impact and adds lots of visual interest…and it’s easy to do! If you recreate this card, share a photo with me…I would love to see what you create! 🙂
LikeLike
[…] member and blogger from Claymont, DE and you can see more details about this project on her blog here. Carol’s blog […]
LikeLike